
The beginner photographer’s guide to file conversion (RAW, JPEG, TIFF, PNG)
At some point, every beginner photographer hits the same wall: you take a photo you love, you export it, and suddenly it looks softer, smaller, or oddly different in color. Or you send it to someone and they can’t open it.
That’s not you being “bad at editing.” It’s file formats. Understanding when to use RAW, JPEG, TIFF, and PNG is the fastest way to keep your photos looking the way you meant them to.
Here’s the good news: file conversion isn’t a mysterious dark art. It’s simply how photographers move images through different stages of life. One format is best for capturing maximum detail, another for editing without loss, another for fast sharing, and another for special cases like transparency. The trick is knowing which “container” fits the job and what you’re giving up (or preserving) when you convert.
Let’s break down how photographers actually use file conversion to manage RAW, JPEG, TIFF, and PNG, what happens to quality along the way, and the best practices that keep your images looking sharp now and editable later.
Think of formats as roles, not rankings
Beginners often ask, “Which file format is best?” That’s like asking whether a chef’s knife is better than a frying pan. The answer depends on what you’re doing.
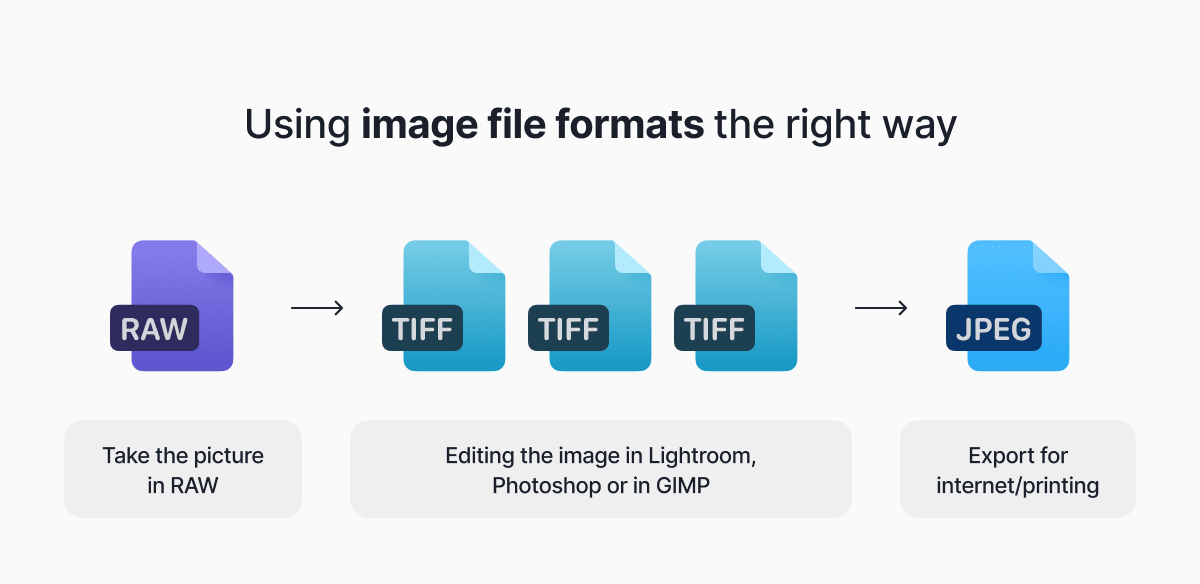
Most modern workflows use multiple formats on purpose:
- You capture in RAW (or RAW+JPEG).
- You edit from RAW in software that reads camera files e.g Photoshop or Lightroom.
- You export into JPEG for sharing, or TIFF for high-quality masters and print pipelines.
- You use PNG when you need transparency or crisp graphic edges.
Conversion is the bridge between those stages.
Image: we should create a workflow something like this but reflecting what we see above
RAW: your “digital negative” (and why it’s not meant for sharing)
“Should I shoot RAW or JPEG?” is the beginner classic, and the most practical answer is: shoot RAW when you want editing flexibility, shoot JPEG when you want speed and convenience, and consider RAW+JPEG if you’re still learning and want immediate shareable files.
RAW files contain the most information your camera captured, which is why they’re larger than JPEGs and why they tolerate big edits better. Adobe describes RAW as essentially the sensor’s full capture data, giving you more control in post-processing.
A RAW file also isn’t a finished “picture” in the same way a JPEG is. Your camera (or editing software) has to interpret that data into something viewable. That interpretation includes choices like white balance, contrast, sharpening, and noise reduction. When you export from RAW, you’re baking those choices into a final image file.
Beginner best practice: keep the RAW files. Even if you export perfect JPEGs today, you might want to re-edit later with better skills, different tastes, or improved software tools.
Another common question: “Do I delete RAW after editing?” If storage allows, don’t. RAW is your safety net.
JPEG: the universal delivery format (with a quality catch)
JPEG is everywhere because it’s small, compatible, and quick. It’s the format most websites expect, most clients can open, and most phones share by default.
The catch is that JPEG uses lossy compression, meaning it reduces file size by throwing away some image data. Adobe’s own JPEG guidance is clear about the core tradeoff: JPEG is designed to compress efficiently, which is why it’s so widely used.
So, will converting RAW to JPEG “lose quality”? In one sense, yes: you’re moving from a high-data capture format to a compressed delivery format. In another sense, a high-quality JPEG export can look excellent, and for most online use you’ll never notice the difference.
Where beginners get burned is re-saving JPEGs repeatedly. Each save can add a little more damage (artifacts, smeared detail, blocky edges in gradients). If you need to tweak a photo later, go back to the RAW (or a TIFF master), then export a fresh JPEG again.
The export settings that matter most for JPEG
If you’re exporting from Lightroom or similar software, your choices can feel like a cockpit. Here are the ones that actually affect real-world results:
Quality slider: Higher quality generally means bigger files. Many photographers find that “high but not max” is a sweet spot for web and general delivery, especially when you’re exporting lots of images.
Color space: For web and general sharing, sRGB is the safest option because it displays more consistently across browsers and devices. Some export tools explicitly include the ability to convert to sRGB for web output.
Resizing: If you resize smaller for Instagram, email, or a website, you’re permanently reducing pixel data. That’s fine, but don’t overwrite your originals.
Sharpening: Many export dialogs include “output sharpening” for screen or print. It’s not mandatory, but it can help images look crisp in their final destination.
A quick myth-buster while we’re here: PPI/DPI numbers don’t magically improve web quality. For screens, pixel dimensions matter most. For print, physical size and print resolution matter.
TIFF: the high-quality workhorse for printing and archiving
If JPEG is your “send it anywhere” format, TIFF is your “keep it pristine” format.
TIFF is commonly used when photographers want a high-quality master file without JPEG-style compression losses. It often supports higher bit depth (like 16-bit), which can preserve smoother gradients and more editing headroom.
Beginners often ask: “Should I export as TIFF or JPEG?” The practical answer is: use TIFF when you need a master (archiving, heavy retouching, high-end printing, handoff to a designer), and use JPEG when you need a deliverable (sharing, websites, client galleries).
This also shows up as: “Is TIFF better than JPEG for printing?” Technically, TIFF can preserve more data and avoid compression artifacts, but many prints from high-quality JPEGs look indistinguishable. The deciding factor is often your lab’s preferences and how much editing/retouching the file needs to survive.
The biggest downside is file size. TIFFs can be huge. If you export a full-resolution, 16-bit TIFF for every photo you take, your storage drive will start making sad noises.
Beginner best practice: archive TIFFs selectively. Keep TIFF masters for your best work, client finals, and images you expect to re-use or re-edit.
PNG: great for transparency and graphics, usually not for photos
PNG is lossless and supports transparency, which is why it’s popular for logos, overlays, and cutouts. But for typical photographic images, PNG usually creates much larger files than JPEG without delivering a visible benefit in normal viewing.
The core difference is clear: PNG’s lossless compression often makes it bigger than JPEG, and PNG supports transparency while JPEG doesn’t.
So when should a beginner photographer use PNG?
- When you need a transparent background (watermarks, composites, product cutouts).
- When your image includes text or sharp graphic edges that JPEG compression might blur.
- When you’re creating web assets rather than delivering photographs.
Conversion quality: what actually changes when you switch formats
Beginners tend to blame formats for quality issues that are really caused by settings. Here’s what’s actually happening under the hood:
RAW to anything: You’re rendering sensor data into a finished image. Your edits, camera profile, sharpening, and noise reduction choices matter a lot here.
JPEG compression: This is where you can create artifacts, especially in skies, gradients, fine patterns, and heavy sharpening. One good export is fine. Multiple re-saves are the danger zone.
Bit depth changes: Exporting to 8-bit (common in JPEG) reduces tonal precision compared to 16-bit formats (common in TIFF workflows). You’ll notice this most in aggressive edits and smooth gradients.
Resizing: Downscaling is a one-way trip. Great for web performance, not great if you later need a large print.
Color space mismatch: Exporting in a wide-gamut color space and viewing it in an app that assumes sRGB can make colors look wrong. That’s why sRGB is often recommended for web delivery, and why some batch tools explicitly offer converting to sRGB.
Batch conversion: how photographers avoid exporting one file at a time forever
Once you shoot a birthday party, a weekend trip, or anything involving sunlight and motion, you’ll have a new question: “How do I convert a bunch of photos quickly?”
Two common tools:
Lightroom export presets: Great for repeating consistent settings like “Web JPEG sRGB” or “Print TIFF.”
Photoshop Image Processor: Adobe’s documentation shows how to batch convert and resize, and even save multiple formats at once (JPEG, PSD, TIFF), with options for metadata and converting to sRGB.
Beginner best practice: create two export presets you can trust: one for web sharing (JPEG, sRGB, resized) and one for keeping a high-quality master (TIFF or high-quality JPEG at full resolution). You’ll save time and avoid the “wait, what did I export last time?” spiral.
A beginner-friendly archiving strategy that won’t melt your storage
Archiving is where file conversion becomes less about aesthetics and more about sanity.
A solid, simple approach:
- Keep your RAW files as the source.
- Keep your edits (catalog/sidecars) so you can re-export later.
- Export JPEGs for sharing and delivery.
- Export TIFF masters for your best work, print finals, and anything you might need to re-edit heavily.
If you’re tight on storage, prioritize RAW and edits first. TIFF masters are optional, and you can be selective.
Greg Benz, a photographer who has written extensively about photographer file formats, generally recommends keeping your camera RAWs and being thoughtful about when you create bigger intermediates.
The practical takeaway
If you’re a beginner photographer, you don’t need to memorize every spec sheet. You need a repeatable habit:
- Shoot RAW when you care about editing latitude.
- Export JPEG when you need compatibility and speed.
- Use TIFF when you need a high-quality master or print pipeline file.
- Use PNG when you need transparency or graphic crispness.
File conversion isn’t about chasing the “best” format. It’s about choosing the right format at the right moment, so your photos stay sharp, shareable, and future-proof.
Latest posts

Knowledge Base
RAW vs JPEG: which format is right for you
Raw vs JPEG: which image format is right for you? Learn the real difference between RAW and JPEG image formats, including image quality, file size, editing flexibility, and storage needs.

Knowledge Base
Batch file conversion, solved: how Documents.io handles your document backlog
Use Documents.io to convert and compress multiple documents at once in your browser or the Documents app. Learn how its batch tools handle PDFs, Office files, media and more.

Knowledge Base
Best audio format 2026: how to choose for music, streaming, and recording
Confused about the best audio format? We break down MP3 vs FLAC vs WAV, lossless vs lossy, and which format to use for music, streaming, podcasts and recording.